How to create a basic Blast2GO workflow:
- Create a new workflow.
Go to: Workflows > New Workflow... - Add the desired functions with right-click > Add Element > Blast2GO, or simply drag and drop them from the Toolbox.
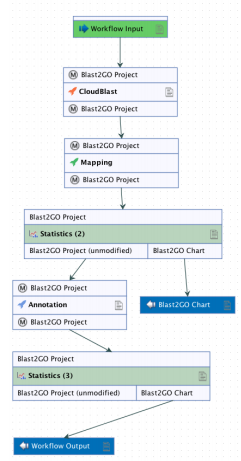
We add CloudBlast, Mapping, Annotation and two Statistics boxes. - The selected functions now appear in the workflow area, we can arrange them to graphically form the pipeline shown in figure 1.
- Now we connect all the available outputs with the logical proceeding inputs. Apart from that all functions that create a result that you want to save to disk, have to be connected to a so-called workflow output. To achieve this, we right-click on the desired functions outputs and select Use as Workflow Output. We must not forget to connect the workflow input to the CloudBlast, which will be our entrance point of the pipeline.
- The next step would be to configure a few parameters (Configurable functions are indicated by a little notepad symbol). To set the parameters of a function, we double-click on it to show a wizard similar to the ordinary one. We can activate the Data Distribution chart in both statistic steps. With this we can examine the success-rate of the mapping step, while the annotation step is still running.
- After configuring the functions as desired, we save the workflow. The workflow can now be executed.
It is important to understand that a Blast2GO Project has no attribute which indicates the status of a project (e.g. project is mapped or annotated). The workbench is therefore not able to verify if the processed project is annotated, mapped or has only blast results. Therefore whenever we need to choose input data or connect algorithms in the workflow we have to verify this ourselves and check that all steps are connected in the right order; e.g. the mapping step has to be placed before the annotation. Otherwise we end up with a mapped project without annotations since the annotation step needs the information from the mapping. However we will not receive any error messages or similar, because of the above mentioned reason.
